FAQ
Create as many videos as you want, 3 or 300, we’re looking forward to it!
Depending on your subscription plan, the download is available in Serial Digital (SD) or High Definition (HD).
Further information here: Which video formats are available?
Record your own voice or upload a pre-recorded voiceover.
Check here for more information on voiceovers:
You want a simpleshow with blue scribbles? No problem! Depending on your subscription, you can color all scribbles in your video (except uploaded images by user).
Emphasize individual scribbles with our effects. Choose between ticks or check marks, X, or asterisks.
You can find more about this topic here: How to find the perfect visuals?
Depending on your subscription, you can use and edit subtitles in your simpleshow.
Standard subtitles are provided by your script which also relates to the visualizations on your canvas.
Add subtitles to your video by choosing “show subtitles” in the Finalize stage.
Your script appears as a subtitle-text on the bottom part of your canvas. Next to it you’ll find a pen symbol.
Click it to adjust your subtitles or translate them to another language.
Depending on your subscription plan, you can choose up to 6 different automated voices.
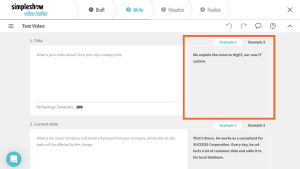
Our storyline templates support your script writing by providing a structure, useful tips and two practical examples.
You have full control over the privacy of your video.
Depending on your subscription plan, you can remove the simpleshow video maker watermark, the logo which appears in the upper right corner of your video.
How exactly does this work? Find out here: What is a watermark?
In the chapter menu, you can find previous versions of your script and also restore them.
Find more information here: Can I go back to an earlier version of a video?
Customize your closing frame with one of our templates. You can insert texts, upload images and edit our existing templates.
How exactly does this work? Find out here: How to use closing frames?
Browse our scribble database to find the best visuals for your video.
With a business subscription you can use your video in marketing, customer communication or advertising. However, you can not assign or sell your rights to third parties.
More information about commercial rights here: Can I use my video commercially?
In our Pro-subscription plan, you can work as a team. Comment, transfer and edit projects with up to 3 team members!
See all subscription features here: Subscription plans
With a pro subscription, you’re allowed to produce simpleshow videos and pass them on to your clients and customers commercially.
You can permanently insert your logo into your simpleshows. It will appear in the upper right corner of your video and can be adjusted individually.
You can find more information here: How can I add my own branding logo?
Upload your own font and use it in your simpleshow.
Manage uploaded images in your settings section. Share them with your team members, download or delete them.
Verwalte deine hochgeladenen Bilder in deinen Einstellungen. Teile hochgeladene Bilder mit deinen Teammitgliedern, lade sie herunter oder lösche sie.
Edit subtitles depending on your subscription plan.
For further details visit: How to use subtitles
Depending on your subscription plan, you can choose between 1-5 different music tracks.
If you want to use your own music, just upload it in the Finalize stage.
Do you want to show your video to other people? After finalizing your video, you’ll find a landing page. Send the public link to your friends, family and teachers so they can take a look at your video.
After deleting your simpleshow video maker account, the landing page for your videos will be deactivated shortly thereafter.
Yes, all simpleshow video maker projects need a storyline. We’ve put lots of thoughts and experience into the creation of our storyline templates.
They will guide you in writing a compelling storyline by giving advice and practical examples.
If you’re not sure which storyline fits your topic best, have a look at some example videos.
A great script is fundamental for high-quality explainer videos.
Our storyline templates will guide you through the whole process:
– Provides a basic structure, dividing your story into plausible chapters,
– Guides you with assistance in each chapter
– Two practical examples in each chapter

You can choose between various storyline categories:
– Professional, for business users
– Educational, for students and teachers
– Personal, for casual and informal storylines
If no storyline meets your demands, you can also choose the blank template in every category.
(Please note that we can’t assist you when using a blank template!)

It’s possible to use PowerPoint presentations as a basis for your explainer video script.
Please note the technical restrictions:
– Only use .ppt and .pptx format
– Maximum presentation file size is 50 MB
– Your PowerPoint presentation is limited to 20 Slides
simpleshow video maker analyzes your presentation and identifies relevant text content for your script.
Your text will be automatically divided into several chapters.
For orientation, you can always check your original slides on the right side .

There are 4 options to edit your script:
1. Change and rewrite text
2. Delete whole text-boxes
3. Rearrange text-boxes
4. Add new text-boxes

In case you exceed the limit of 2750 characters in total, you need to shorten your text.
However, don’t worry, deleted chapters can easily be restored.
A video can just be as good as the script it is based on. At simpleshow video maker, your script is indispensable for visualization. We scan it for words and expressions that will appear as illustrations in your video and we also give you suggestions on how to visualize your key messages best. As the timing of all animations depends on your script as well, you see why it is such an import task.
Here you can find some tips on how to write a great script.
It has never been easier to write your own script. The quality of your script is the key to a successful explainer video.
At first, think about how to structure your video. The storyline template will guide you through the process.
Think about your audience:
Change your perspective! Keep in mind staying relevant for your audience. Your and their interests may differ:
- Which knowledge does your audience have?
- Is your topic difficult to understand?
- Do they know the technical terms and foreign words?
- Can your audience identify with the story?
- Is all information relevant to them?

Give your audience an overview:
Make your audience understand the big picture first. Afterwards, you can add details much easier and more effectively.
Use simple language:
Avoid technical terms, terminology, and special short forms.
Use short sentences:
The easier your audience can understand your text, the more successful your explainer video will be.
Think about 2 things:
– Will my audience understand the text while listening to it?
– Is my text easy to pronounce?
If your text it not easy, try to simplify it. Don’t use loanwords or difficult technical terms.
Use Characters:
Introduce a main character to your story. It will help your audience to identify with the topic and story.
The character might have a problem or is stuck in a situation which could be solved. You can introduce a second character who is helping the first one or the other way round.
That brings your script to life!
Here’s our cheat sheet for you:
- Build a structure
- What’s the essence of your story?
- Regardless the context of your explanation, you should always put your audience first.
- Use the 5 rules of explanation.
- Use short sentences.
- Use simple language.
In the Write stage, you create your video script which will later be read aloud by the audio voice over.
Writing a script is the basis of your video, hence it is very important to devote special attention to this phase!
On the left side, you will see the structure of your storyline. The guidance below each heading will explain how to split your text among the chapters.
On the right side, we always support you with two practical examples, helping you getting inspired.
Above chapter one, you’ll find the navigation bar consisting of various buttons:
- Chapter Menu: The structure of your simpleshow and the history of your script
- Guidance: Which part of your story should appear in which chapter?
- Reading mode: Clearly arranged overview of your text
- Tutorial: Helps you in this stage.
- Comment: You and your invited team members are able to comment on your script
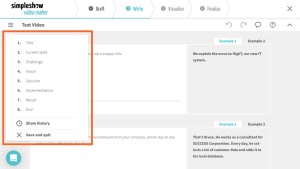
You can also leave chapters empty. If so, they will not appear in the final version of your simpleshow. You can also split a chapter up into several scenes later on in the Visualize stage.
However, you cannot add new slides. We don’t want users to make simpleshows longer than 3-4 minutes. It is proven that concentration decreases after 3-4 minutes of watching a video.
We understand this can be frustrating but try to focus on your most important messages!
For valuable tips on writing a great script, have a look here: How do I write a great script
Yes, you can! You can do this in multiple ways:
Choose Language
simpleshow video maker currently works in English and German. You can choose your video language at the beginning of the video creation process.
Write In Various Languages
In the write step, you can create your video in any language. However, the tool may not be able to identify all of your keywords, but you can choose your keywords and images manually. If you go this route, be sure to record your own voiceover or upload a professional voiceover.
Edit On-Screen Subtitle Language
Depending on your simpleshow video maker subscription, on-screen video subtitles can be edited in the Finalize phase. For example, if you create your initial video in English but quickly need a Spanish version, you can make a copy of the English video from your videos dashboard, go to the Finalize phase, and edit the subtitles so they show up in Spanish.
On the left-hand side, you will find your script and your canvas, which already contains suitable illustrations.
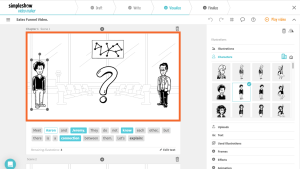
Your script has been split into scenes. In each scene, you can use 7 keywords. At the end of each scene, your illustrations are wiped off the canvas so each scene begins with a blank canvas.
By clicking on an illustration, the inspector on the right-hand side is activated. There, you can edit your illustrations. Choose the right visuals for your keyword, upload your own and customize them in various ways. Find more on this in How to find the perfect visuals?
Correct typos in your script, split scenes, and customize your canvas. By clicking the “Play video”-button in the navigation bar, you can watch a preview of your simpleshow with the current settings.
Each illustration on the canvas is connected to a keyword. Keywords connected to an illustration are marked turquoise.
We recommend the following workflow:
1. Divide your text into scenes
2. Choose the keywords you want to visualize
3. Choose the visuals you want
4. Arrange your visuals by moving them on the canvas
If you’d like to change the background color of your simpleshow, you can upload a pre-created background image on your first keyword, and then place all additional keyword images over the new background image.
Although all of our images are black and white, the scribbles we provide include a diverse set of character illustrations. To search for a specific set of characteristics, enter what you are looking for into the search tool.
You can also upload your own images or any image you own rights to if you’d like to include a more diverse character set!
Our Explainer Engine analyzes your script for semantically important words – so-called keywords. Active ones are visualized on the canvas. For example, the word “idea” is visualized as a bulb. Every illustration is connected to a keyword.
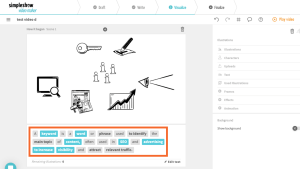
Selected and activated keywords are written in turqoise letters and have a turqoise frame. Every activated keyword is connected to an illustration on the canvas.
How can I select keywords?
Every single word of your script can be made into an active keyword by a simple click. Select a keyword, choose one of our suggested illustrations or use text on the canvas.
You can select up to 7 keywords per scene. The amount of keywords you select can help you with improving the timing of your video.
How can I deselect keywords?
You can deselect keywords by clicking the X-sign above it. If you deselect a keyword, the corresponding scribble will be deleted from the canvas. To create a good rhythm, try finding a balance between how much text is heard and how many actions are seen on the canvas.
Our explainer engine analyzes your script and finds keywords. Matching your keywords, we recommend suitable illustrations.
You can edit our illustrations, upload your own pictures or use text on the canvas.
Illustration choice
Click on an illustration and the gallery on the right-hand side shows other suitable illustrations.
Illustration search
If you’re looking for a completely different scribble, you can search for it manually in our scribble database. In order to find a different matching scribble, we recommend searching for synonyms.
Character choice
We offer you a vast selection of characters. You have the choice between female and male characters of all age groups.
Upload your own image
simpleshow video maker allows you to upload your own images. Please respect copyright law and only use images you own yourself or that are licensed for third-party use.
Text on canvas
Instead of pictures, you can also use our text feature to visualize text on the screen, for example to show the title of your explainer video. For this, you can choose between various fonts or upload your own.
Used illustrations
If you want to find an illustration you used before, this section helps you to find them easily.
Frames
There are different frames for illustrations and text. Using a polaroid frame on one of your illustrations, for example, gives it a photo-like feel.
Effects
Put emphasis on your message by giving your illustrations effects. You can choose between negating them with an X, highlighting them with a check mark or by adding three little stars.
Remove illustrations
By clicking on the minus symbol above an active keyword, you can deactivate it. This also removes the corresponding illustration from the canvas.
Of course, you can! If you select an illustration with our cursor, you can reposition, scale, rotate, and even mirror it. For optimal positioning, we recommend making use of the grid view, which you can activate in the menu bar above.
For further information please read: How to find the perfect visuals?
simpleshow video maker allows you to upload your own images. Please make sure they aren’t bigger than 7 MB. Furthermore, we commend png files. Please respect copyright law and only use images you own yourself or that are licensed for third-party use.
The simple answer is: more than 7 illustrations usually worsens picture composition and the scribbles get too small to be recognized easily. If you feel the need for additional illustrations, consider splitting up your text into several scenes. Each new scene gives you 7 new illustration possibilities.
You would like to show your logo and contact information at the end of your simpleshow?
Awesome, we’ll provide you with 3 different templates for that. You can edit these templates, save and share them with your team members.
Closing frames in the Visualize stage
At the end of the Visualize stage, you’ll find our closing-frames section. You can edit most of them them by adding an image or text.
Create closing frame templates
In the video settings section, you can create and edit closing frames as well as share them with your team. To access this feature, please go to video settings. Choose a template and upload your image or text. Now you can save your closing frame. Afterwards, you’ll also find your closing frame as a template in the Visualize stage.
You can also share closing frames with your team. If necessary, you can protect them from being edited by clicking the lock symbol.
The Timing Engine is one of the smart AI tools that makes creating your video in simpleshow video maker easier than ever. All you do is record (or upload) your voice and your video will automatically sync allowing your voice to set the natural pace.
All project languages of simpleshow video maker are supported by the Timing Engine. However, our smart technology uses different matching qualities to determine the best way to naturally adjust your video.
word-by-word: Single words can be recognized. So you can speak dynamically (different speeds in one recording, speaking pauses in the middle of a scene).
start-to-end: This is an estimation of the timings, based on your first and last spoken word. You will get the best results if you speak steadily.
Some languages only support start-to-end matching. Other languages support word-by-word (e.g. English and German). If your spoken text differs too much from your video script it will fall back to start-to-end.
Yes, you can use abbreviations in your script. In English and German, we also feature generic abbreviations.
For example, write “E.E.T.S.” or “eets” or “EETS” or “e. ets” but say “Early English Text Society”. However, it is important that the abbreviation contains all starting letters of the actual words in order. For other languages, abbreviations that are spoken as full words might decrease the matching quality.
Yes, numbers can be used in your script. English and German have been explicitly optimized for number recognition. For other languages, the recognition may be less accurate but sufficient. We recommend testing your script to confirm if the numbers are correct.
A custom voice-over helps bring your video to life. By recording your voice and adding it to your video, the video content has an added layer of depth and engagement. By using different speeds, volumes, tones, and inflections, you add dimension to your animation.
When you preview your video, you may see a badge that says “Timing engine warning”, which is related to your currently visible scene. This means that the Timing Engine has recognized that you may want to make adjustments to your video.
This could happen if:
- You uploaded/recorded a voice-over that doesn’t contain any words.
- You use a project or project copy with an older upload or recording (added before 10th August 2022). In this case, we haven’t analyzed your audio yet. Just re-record or re-upload your voice.
- You used the full upload mode, and your words couldn’t be understood, the scene before had a warning, or there weren’t sufficient pauses between your scenes.
In any of those cases, make sure you like how video and audio are synchronized. If the results are fine for you, you can safely ignore the hint.
The easiest and most time-efficient way to record your voice is to use the voice recording feature within simpleshow video maker.
For those users with advanced knowledge of audio files and who do not want to record in simpleshow video maker, uploading scene by scene is the best option. You’ll need to record your script externally and upload the files, scene-by-scene, and the Timing Engine will then adjust your video to flow with your voice.
The third option is to record the entire script externally and upload one file for your video. When choosing this option, the Timing Engine feature is less effective and if you are not satisfied with the flow of your video, we recommend using one of the other options.
Have a little patience until you watch the video preview. It can take up to two minutes for uploaded audio files to be processed.
Depending on your subscription, you can change the color of all simpleshow scribbles in the Finalize stage. To change the color of one image, you can upload an image that you have rights to use.
After writing your script and creating your storyboard, it’s time to finalize your video!
You’ll find your workspace divided into two sections: Your scenes on the left, the voice over section on the right.
You can now choose between our automatic voice-over, uploading a precast audio file or recording your own voice. If desired, you can add subtitles or adjust the tempo of your video.
We recommend the following workflow:
- choose a voice-over option
- choose a tempo for your video
- record or upload your voice-over for each scene
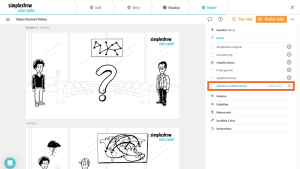
Subtitles
Add subtitles to your video by choosing “show subtitles”.
Your script appears as a subtitle-text at the bottom part of your canvas. Next to it you’ll find a pen symbol. Click it to adjust your subtitles or translate them to another language.
Watermarks
Upload your watermarks within the settings section. In finalize stage, you can decide whether to use them or not.
Colorize scribbles
Choose your favorite color and colorize the scribbles in your simpleshow. Please note: Images uploaded by the user won’t get colorized!
In Finalize stage, you can record your own voice over using your computer’s microphone. We call it karaoke mode. Try it – it’s fun!
Before you start recording, you should define a video playing speed. Start recording once you’ve decided on a tempo. Notice: The slower your video tempo, the more time you’ll have for recording phrases.
If you have technical issues:
simpleshow video maker needs permission to use your microphone in order to record audio. Your browser should ask if you want to give this permission. These articles might help:
For Firefox browser:
https://support.mozilla.org/de/search?q=hello-cant-access-my-camera-or-microphone
For Google Chrome browser:
https://support.google.com/chrome/answer/2693767?hl=en
You can add precast audio files to your video in the Finalize stage.
To get your video and voice over in sync, we recommend following these three steps.
- Choose your preferred tempo and complete the clip with the automated voice Paul first.
- Download the video and record a voiceover for each scene.
- Select “Edit project” to return to your explainer video and upload your voice files in the Finalize step. This will overwrite the existing video with the self-made voice-over version.
Yes, depending on your subscription, you can! If you want to use your own music, just upload it in Finalize stage.
With the Free subscription, you can’t. We are proud to empower anyone to create compelling, high-quality, and fun simpleshow videos for free. Accepting our branding logo is the only thing we ask for in return 🙂
With the Business subscription, you can hide the simpleshow video maker watermark in the Finalize stage.
You are able to upload your own watermark in the Pro subscription. Take a look at this article: How do I use the Finalize stage?

You know it from television: Many TV channels show their logos at the top left corner of the screen. You can do the same now: Your logo appears on the top right corner during your simpleshow. We call it a watermark.
How can I use my own watermark?
Go to video settings. There you’ll find the watermark section and be able to upload your logo. We recommend using an image file in .png format.
As soon as you upload and saved your watermark, go to the Finalize stage and decide whether to use it or not.
You can always go back to editing your simpleshow. Just click the ‘edit project’ button on your dashboard, or on a project’s video page.
Using the history feature, you can also take a look at older versions of your project.
Also see here: Can I go back to an earlier version of my video?
As soon as you alter a project and decide to click the “Finalize video” button,
we will overwrite the existing video with the new one.
But you can restore older versions of your project in your history.
Just click on the chapter menu and choose “Show history”.
Get more information on this topic: I have finalized a video. How can I edit the project afterwards?
After finalizing your simpleshow clip, you will be able to download it as a MP4-video-file.
Depending on your subscription plan, the download is available in Serial Digital (SD) or High Definition (HD).
You want to show your explainer video in class or at a birthday party? – Awesome! As long as you don’t change the video after you download it, you’re free to use it for school or private purposes.
To use your videos in a business context, you need to upgrade your subscription plan to Business or Pro.
The Pro plan even enables you to pass your video on to third parties commercially.
For detailed licensing information check our Terms & Conditions.
If you have a YouTube, Vimeo, or Wistia channel, you can connect it to your simpleshow video maker account. This makes publishing your videos even more simple.
Connect your account by clicking the “Connect” button below the channel you want to connect to.
Follow the instructions to allow the publishing channel to access your simpleshow video maker account.
Create a YouTube account and click on “connect.” Google will ask you for permission to upload your videos with only one click from now on.
It is simple to export your video and import it into your LMS! Just export the video as an mp4 file in HD or SD and upload it into your LMS from there.
simpleshow video maker provides you with a unique, new way of video making. We have taken all our experience of over 8 years in explainer video creation and developed an easy-to-use video maker that guides you through a simple process.
The most important lesson learned: ‘a great video needs a great script’. Easier said than done, huh. Don’t worry, we do our best to support you when you write your script. You can choose from a variety of Storyline templates that we created for various topics. These storylines give your video structure and provide you with easy-to-follow guidance and examples.
Afterwards, our Explainer Engine will suggest illustrations from our database to visualize your story, it creates a storyboard, and with just a few clicks your video is finished.
simpleshow video maker is the only video making tool, that will not bother you with timelines, keyframes or endless animation timing – we do all of this auto-magically.
Visit your ‘settings page‘ to switch the tutorials ON or OFF in our editor.
You can always open them manually in the editor by clicking the ‘question mark’ in your toolbar.
If you want to opt-out of specific tutorials, just check the “don’t show again” box.
Click your avatar in the upper right corner and choose “My Settings” from the drop down menu.
Here you can change your username, email address and password.
Enter your old password, then enter a new one. Choose wisely. We recommend using at least 6 of the following characters:
a-z A-Z 0-9 ! # $ % ’ ( ) * + , – . / :
If you forgot your password please follow these steps:
- Click ‘Forgot your password?’ in the login window.
- Check your email inbox or spam folder as required.
- Log into simpleshow video maker with your email address and the new password provided.
- Pick a new password in your account settings.
You can delete your account in your settings menu. We will permanently remove your personal data and all of your projects.
We are sorry to see you leave. What can we do to improve simpleshow video maker in the future? Your honest feedback is more than welcome.
If you have a restricted Google Mail account and are not able to get emails from outside your network: please use your Google account or Facebook account.
The best way for students to sign up to simpleshow video maker with Google Chromebooks is the Google Sign Up on the simpleshow video maker homepage.
Click on “Sign up” and then “Sign up with Google.” After Google has connected with simpleshow video maker, please click on “Sign in”. Using this sign up method, students can start their projects easily and don’t have to activate their accounts via email.
Congratulations on using simpleshow video maker!
Please choose a subscription model and payment method.
Free subscription:
Enter your first and last name, e-mail address and password. Also check the box below to accept our general terms and conditions before you can sign up.
After that, we’ll send you an activation link via e-mail. As soon as you activate your account, you can start creating your first explainer video.
Fun, Business, and Pro subscription:
Enter your first and last name, e-mail address and password. Also check the box below to accept our terms and conditions before you can sign up.
Think of a name for your team and choose a payment rate, either monthly or yearly.
Subsequently, fill in your company’s and the account holder’s information. VAT will be added automatically.
Finally, checkout via credit card or Paypal.
Credit card
We accept Visa, MasterCard, and Amex. Fill in your credit card number, expiration date and the 3-digit CVC number on the back of your card.
Check your information carefully and complete your order.
We’ll send an activation link via e-mail. Go to your inbox and activate your simpleshow video maker account by clicking the link.
Start your first explanation video now!
You can change your personal settings by choosing “Settings” in your avatar’s drop down menu, located in the upper right corner.
Change any of your personal settings by clicking the pen symbol.
Language
simpleshow video maker is available in English and German. You can select your preferred language for the simpleshow video maker homepage and your video projects separately. If you want to write a German script for example, use German as your project language, so our script template and explainer engine will also switch to German.
Don’t worry: You can reselect your project language for every new video you’ll create!
Newsletter
Get simpleshow video maker’s hottest news directly to your inbox by subscribing to our newsletter!
Notifications
If you want to get notified as soon as a team member comments on your project, make sure to enable this feature in your notification settings.
Profile picture
You can use a default profile pictures or upload your own.
Downgrade your subscription by switching to a free subscription plan.
This can be done by manually by switching your subscription to “free” or by clicking the respective button at the bottom of your settings page.
After downgrading, your subscription will expire at the end of the respective contract period (year or month).
In case you’re not changing your subscription plan to “free” within the paid contract period, the contract is automatically extended by an additional year or month (depending on the payment rate you chose for the previous subscription).
If you switch to higher-priced subscription plans during your contract period, the existing subscription will automatically be terminated.
In case you already paid for an older subscription plan which you then cannot use anymore, we will refund the remaining amount.
For detailed information, please visit our Terms & Conditions.