simpleshow video maker Classroom – Essential Tips For Creating simpleshow Videos
simpleshow video maker is an excellent learning tool. Not only does it allow for the watching of video material, but also for the creation of explainer videos by both teachers and students! It is an excellent tool to inject diversity into the learning process and this is especially relevant in a time when online teaching has taken off so dramatically. simpleshow video maker makes online learning less mundane and online methods less predictable as it gives students the opportunity to create their own simpleshow videos. As such, it enhances learning through self-explaining. In addition, it encourages creativity by means of scene editing as students create an aesthetically pleasing product. Moreover, it gives teachers the opportunity to assess a student’s level of understanding.
Students enjoy doing something that deviates from the usual online tasks. They enjoy making simpleshow videos to showcase their knowledge and creativity. If you do not have a Classroom account yet, get one (for free!) and start enrolling your students today. Then, introduce simpleshow video maker to your students by giving them a simple task relating to your subject. Once completed, review their videos and/or allow for peer-reviewing – constructive comments from the rest of the group are useful to improve video creation skills even further.
There are a number of essential tips for creating simpleshow videos that you may also want to share with students. These could be shared before they start making simpleshow videos. Or, for extra impact, perhaps let them first experiment with the video creation process, with complete freedom, and then share the tips after their first attempt:
1. Make sure that the images used make sense!
For example, if the explanation mentions a “navigation instrument” (if the video is, for example, on “Exploration”) one should not use a “saxophone” to represent the “instrument”! Equally unsuitable would be, for example, the use of an image of a “boy” for the word “monarch”. Such images simply do not make sense… What one needs to do is to search for more suitable images in the SEARCH function on the right. (For example, search for “compass” or “navigate” or even “GPS” to get a suitable image that will make more sense for “navigation instrument” than a “saxophone”! And search for “king” or “crown” to get a suitable image for the word “monarch”.)
2. Make sure that the character images that you use make sense too.
When creating simpleshow videos, do not use the same image for two different people. (E.g. Pliny and Ptolemy were not twins – one cannot use the same image to represent both of them! One was a Roman and the other a Greek. So, find suitable images to represent your characters properly.)
3. Use the right words when searching for an image
If the simpleshow video maker tool does not have a suitable image for the word/phrase that you want to represent in a scene it will simply give you a box that looks something like this:

This “box image” cannot be used because, once again, it just does not make sense! This will happen, for example, if the tool is unable to suggest a specific image for a phrase like “technical advances”. If this is the case you need to search for a word like “machine” or “gears”, which may give an image that can be used to represent “technical advances“.
Alternatively, you can:
- Make use of text, by writing the words “technical advances”, using the TEXT function on the right.
- Find a suitable picture on Google and upload it…!!
- Simply de-select the keyword / key phrase and do not use an image for it at all. (Hover over the word in the text and click on the minus to de-select a word.)
4. Be mindful of the simpleshow logo.
Try to not place images in the top right corner of a scene as it will then be behind the mysimpleshow video maker logo… Or, if you like the overlap effect, feel free to combine an image with the logo, by placing it in the top right corner.
5. Do not repeat an image in the same scene.
Think of more interesting ways to display the same concept. (If you use the same keyword twice in a scene, perhaps use the suggested image once and then use the TEXT function to place the written word in the scene.) For example, in the sentence “The game Football is played using a spherical ball known as the football” an image as well as text can be used when the word “football” is said in the voiceover.

6. Make sure that you use a variety of small as well as large images throughout the video.
It makes the layout more interesting.
7. The use of correct punctuation is very important!
That is the only way that the computer voice will know when a sentence begins and when it stops!! (Otherwise, the voice reads the text without any pauses and it absolutely does not make any sense at all!!)
8. Before finalising the video, listen carefully to the voiceover and make sure that it speaks satisfactorily.
For example, in a video about “Exploration” an automated voice may read trade “routes” as trade “rauwts“… If you need the British pronunciation you may need to spell the word differently to get the correct voiceover result. (In this case, if you had to spell the word as “roots”, the voice is more likely to read it with a British pronunciation.)
9. Make sure that there are no long “blank pauses” in the scenes of the video when viewing it.
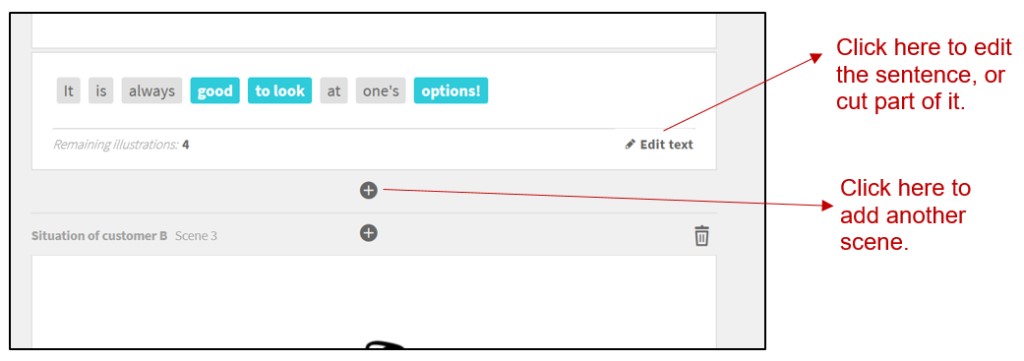
If there are, you need to select more keywords to include more images. If you have used the maximum number of images, you can split the scene:

10. Make sure that the conclusion to your video is good.
A conclusion that says “I hope you enjoyed my video” is not a good conclusion! You need to conclude by giving a cryptic summary of the topic. If the topic is “Why did Europeans go exploring?”, a suitable conclusion could be something like: “Europeans, therefore, went exploring for a number of reasons – the most important of which is probably to find new uncharted territories for their trading requirements.”
11. Check the video before finalising
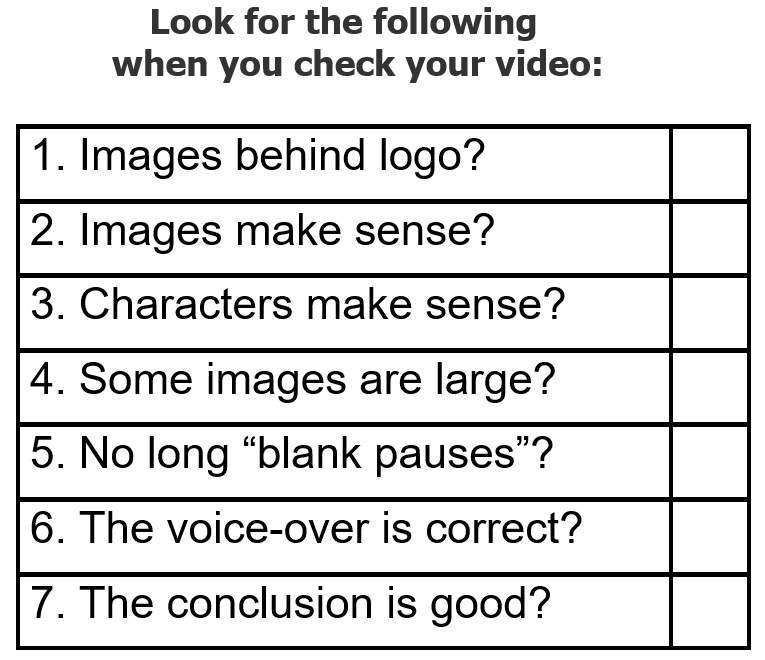
Click PLAY VIDEO (a function that you will find at the top on the right of the simpleshow video maker tool screen). It is a good idea to use the following checklist before finalizing the video:

